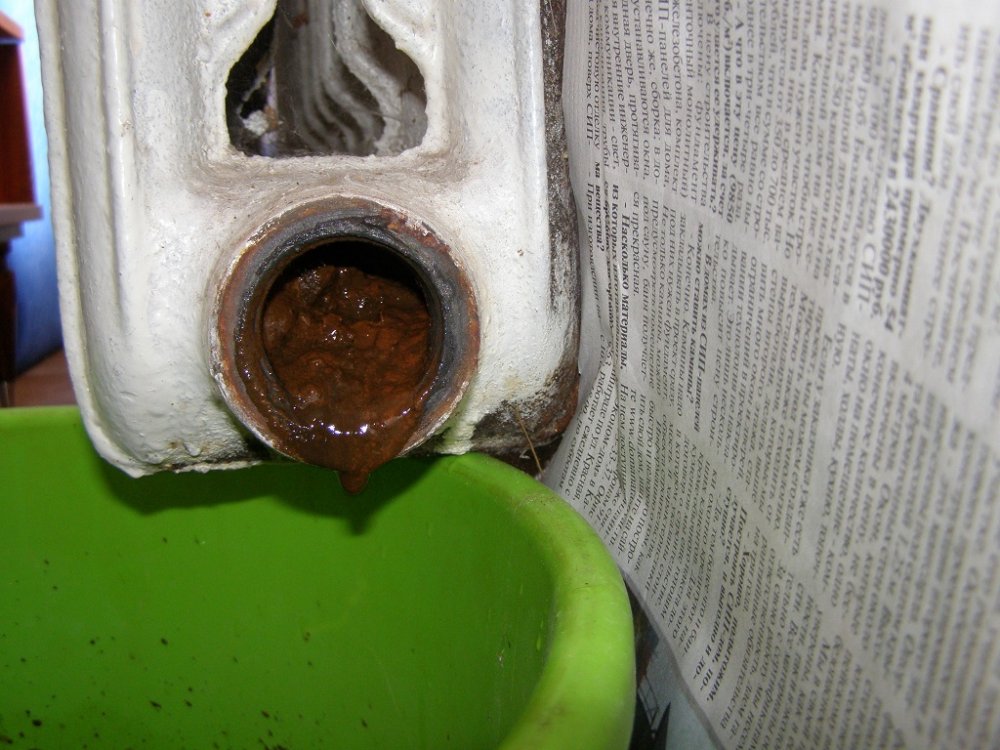
Over time, cast iron radiators lose their thermal power, since the entire inner surface of the battery is contaminated with impurities that floated along with the coolant. At the end of the heating season, a large amount of plaque remains inside the sections, which leads to the destruction of the gaskets.
Preparatory work
Before proceeding with the work, you need to prepare all the necessary work equipment:
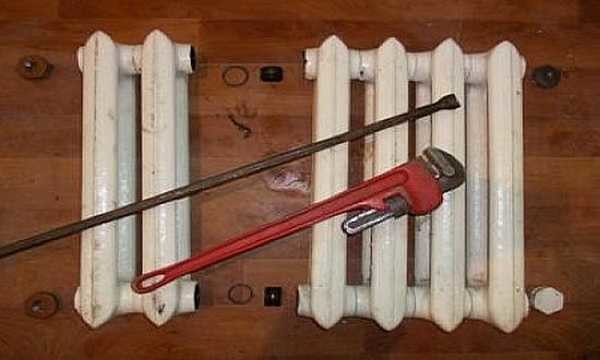
- pipe wrench # 3 to unscrew the sleeves and locknuts;
- metal brush;
- grinder or pipe cutter;
- sledgehammer and hammer;
- a piece of chalk;
- inch pipe from 50 to 100 cm long.
- hacksaw for metal.
It is important to pre-prepare the site where it will be convenient to disassemble the radiators. The best option is a durable wooden shield. Radiators are laid horizontally on the surface and set to work.
The most favorable time for work is summer, when the heating system is off. Before starting to disassemble the radiator into sections, it is important to drain all the coolant from the heating circuit. To do this, unscrew the locknuts that are located on the connections to the radiators. Next, the trays are unscrewed, after which the battery can be removed.
DIY battery disassembly
You can disassemble a cast-iron heating battery in sections as follows:
- It is necessary to find out in which direction the blind plugs are unscrewed, and mark the length of the nipple to be unscrewed on the key. To do this, the key is placed on the radiator, the edge is brought to the point where the sleeve is. A mark is made on the key with chalk in a circle to which the tool is inserted into the radiator.
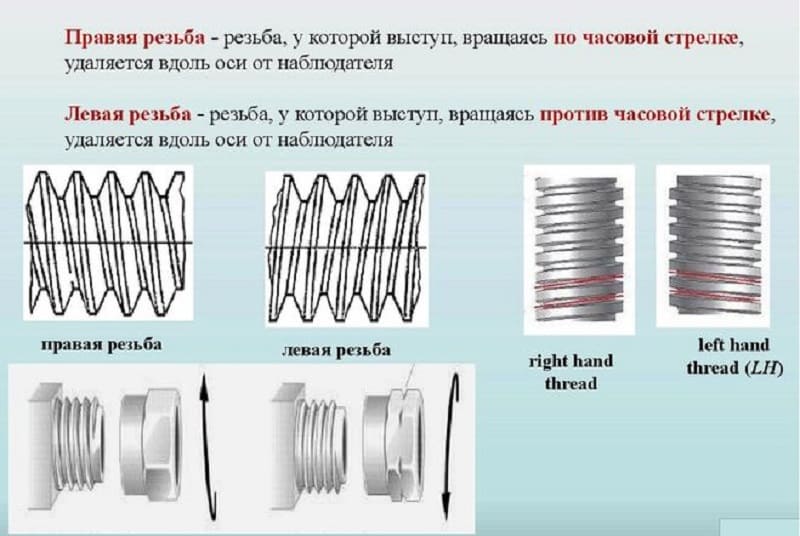
- It is important to figure out which way you need to turn the key for cast iron radiators. The thread can be right or left. The direction of rotation is determined by the foot, which is screwed in from the same side as the key.
- If the thread is right-handed, the sleeve should be screwed in clockwise, therefore, when unrolling, the direction of the key should be directed in the opposite direction. With a left-hand thread, the opposite is true.
- The unwinding of the battery starts from the first section. You need to carefully "rip" the threads on both nipples. In most cases, half a turn of the key is sufficient. Further, the radiators are untwisted in sections on each side so that the interval between them is 0.5 cm.
- When untwisting the heater, it is important to observe the specified gap between the sections, if this rule is neglected, the threads can jam. When starting to untwist the radiator, it is recommended to put the key on the pipe, this will allow you to make less effort when disassembling.
According to this algorithm, all modern cast iron batteries are disassembled. As a rule, such radiators are additionally equipped with caps with the appropriate marking.
Dismantling an old cast iron battery
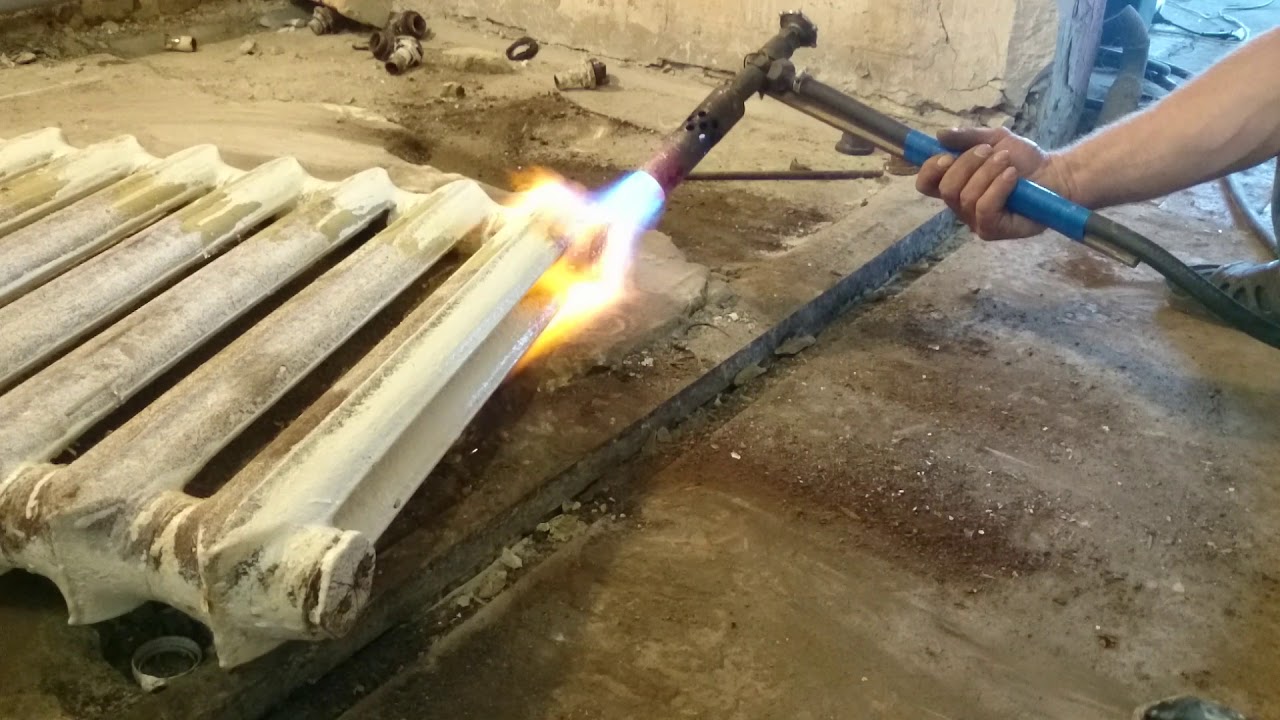
If you have to disassemble an old cast iron battery, some difficulties may arise. If the thread is stuck, it must be thoroughly warmed up before disassembling it using an autogen or blowtorch. When the joints are warm enough, you need to quickly rip off the nipples at the same time on both sides. By a similar principle, other stuck-on radiator elements are unscrewed.
After prolonged use of the device, the metal may corrode thoroughly. For drastic measures, a grinder and / or a hacksaw may be required. The remnants of the nipples are unscrewed from their places without fail, the thread is cleaned with a brush.
Sometimes the application of the described methods does not have the desired effect. The only solution to the problem in this case is to break the radiator with a sledgehammer. The battery is preliminarily removed from the mount, placed on a flat horizontal surface and hit on the axial part of the section until it falls off.
Installing a cast iron battery

In order for the work to be carried out efficiently and the batteries have served for many years, you need to adhere to the following sequence of actions:
- The heating circuit must be turned off and the supply of coolant to the apartment must be stopped.
- The new radiator is hung on brackets with a level check of its horizontal and vertical position.
- The plugs are unscrewed from the heater.
- If the side connection diagram is applied to a one-pipe circuit, a bypass with a valve is pre-installed and connected. If the heating system is two-pipe, squeegees with taps are used.
Before starting the installation work, it is recommended to make sure that the sections are assembled properly and adjust each nipple. After that, the sections are assembled together, the structure is subjected to pressure testing to check the quality of the connection. If no leaks are detected, the structure can be connected directly to the circuit.
After connecting all heating segments, you need to make sure that the work is done efficiently. For this, water is launched under pressure into the pipes. If there are no leaks, strange knocks and noises, the radiators are connected correctly.
Cleaning cast iron radiators
In order for cast iron batteries to serve for decades, they need to be cleaned regularly. Cleaning should be done before disassembling the battery. It is important to take into account that the structure is heavy, it is better to do the work with a partner. You can wash heating devices in the yard or in your own bathroom.
It is recommended to use the following tools:
- water pneumatic gun;
- soda ash;
- means for flushing a car radiator;
- milk serum.
Cleaning with a car detergent is performed as follows:
- Two holes on one section are reliably plugged.
- A product made of cast iron is poured into a product.
- Hot water is poured next.
- The other two holes are also drowned out, the structure is placed on the floor and waited for at least two hours.
- With an interval of 10-15 minutes, one edge of the battery is lifted so that the product is evenly distributed over the entire surface.
Finally, the radiator cavity is well rinsed with clean running water.
It is not difficult to disassemble a cast-iron battery, if you follow all the recommendations. If you have doubts about the quality performance, it is better to invite a qualified specialist.


forgot a person with a lot of weight who will stand on the radiator.