A balcony is an additional room in the house that can be used as a place for recreation. It is impossible to lead the radiator into the loggia, therefore it is recommended to make the floor insulation. It allows you to maintain a comfortable microclimate in the room and reduce heat loss during the operation of the electric heater. To make thermal insulation with your own hands, you need to familiarize yourself with the installation technology, the materials used and the installation instructions. You can insulate the floors yourself or with the help of specialists.
The need for insulation of the balcony floor
The balcony is used infrequently. With a proper arrangement, it can be a good recreation area, a place for storing things and additional space in a small Khrushchev and other multi-storey building. In any case, it is recommended to make it heat-insulated to preserve heat in the apartment.
About 20% of the heat is lost through the floor for the balcony and more than 40% for the loggia. For this reason, it should be insulated.
The main advantages of floor insulation:
- A significant increase in the usable area of the house. The insulated room can be used not only for storing things, but also for spending leisure time in it.
- Improving the microclimate in adjacent rooms. Drafts can form through the balcony. When arranging thermal insulation, heat loss will be lower.
- Noise isolation. Many insulation materials tend to suppress external sounds.
There are two main methods of insulation - passive and active. Passive is aimed at reducing heat losses through the use of thermal insulation. The active one is aimed at increasing the amount of heat that enters the balcony. The main method of active insulation is the installation of a warm floor.
Choice of materials
For passive insulation on the floor in the loggia or on the balcony, the following materials are used:
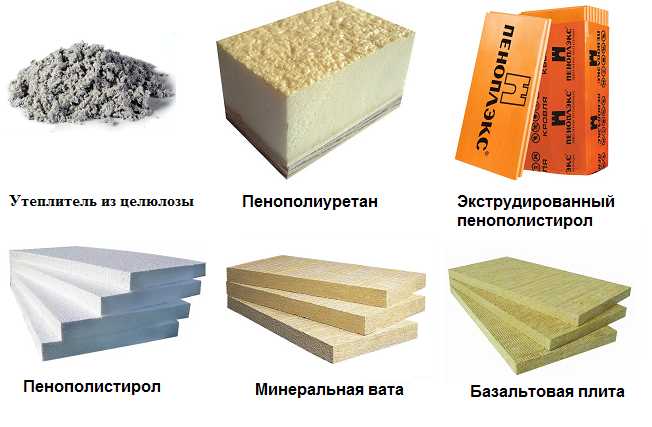
- Penofol. It is a soft heat insulator consisting of polyethylene foam and a foil surface to reflect heat. The thickness ranges from 3 to 10 mm. Penofol is usually used as an additional insulation.
- Styrofoam. It is a well-known rigid insulation with an advantageous combination of price and quality. Allows you not to make a layer of waterproofing, as it does not absorb moisture. It is sold in different densities and thicknesses. Differs in simplicity of laying technology.
- Expanded polystyrene (extruded foam or polystyrene foam). Eco-friendly and safe material with a high density compared to foam and smaller pores. Sold in sheets with a thickness of 20-50 mm. The service life is about 50 years. The cost of expanded polystyrene is higher than that of other heaters. The disadvantages include its flammability.
- Mineral wool or basalt wool. This is a soft insulation that can be inserted into small crevices. It must be laid on logs and subfloors. Available in rolls or mats with different densities. When laying, waterproofing is required.
- Expanded clay. Loose material in the form of crumbs is actively used for thermal insulation. But there are limitations when using it on the balcony. Expanded clay has a significant weight and significantly raises the floor level, therefore it is not recommended to use it as the main heat insulator.
When choosing insulation for a balcony, the following characteristics should be considered:
- The technical condition of the premises. You need to look at the condition of the tiles and the floor surface, the dimensions, the maximum height of the level rise. Any irregularities must be repaired and broken parts replaced.
- Climatic conditions. The level of humidity is especially important, high values of which impose restrictions on the use of soft insulation.
- Floor covering type.
- Estimate. According to the budget that the owner has allocated for thermal insulation, and you can choose the best insulation in terms of price and quality.
The choice of materials depends on the chosen laying technology.
Algorithm for self-warming of the floor
Self-insulation consists of several stages. This is the preparation of the premises and the choice of materials, carrying out design work, laying and final finishing.
Preparatory work
Before insulating the floor on the balcony, you need to inspect its condition. Depending on the type of slabs, the maximum load and weight that will be applied to them are selected. If the condition is satisfactory, you can proceed to assessing the qualities of the floor. With the help of the building level, its curvature is replaced, and the condition of the subfloor is visually inspected. Leveling of slabs and filling of holes is carried out as required. You should not make a screed to level out large differences, as it will give an additional load on the plates and will not allow thermal insulation to be made.
Calculations and selection of materials
After choosing a material, you need to calculate its quantity. It depends on the number of layers and the area. The resulting value should be rounded to the nearest integer, since the heat insulator is sold in sheets or rolls.
You also need to purchase polyurethane foam, hardware, material for steam and waterproofing, floor finish, wooden beams 50 × 50 and a primer. For laying on the floor, it is better to take chipboard, since the material has only linear expansion. Over time, it will not squeak.
From the tools, the master will need a knife for cutting insulation, a drill, a jigsaw, a tape measure, a level, a pencil, a puncher.
Floor insulation technology
Do-it-yourself step-by-step algorithm for warming the floor on the balcony:
- Cleaning the floor from dust, debris, protruding parts.
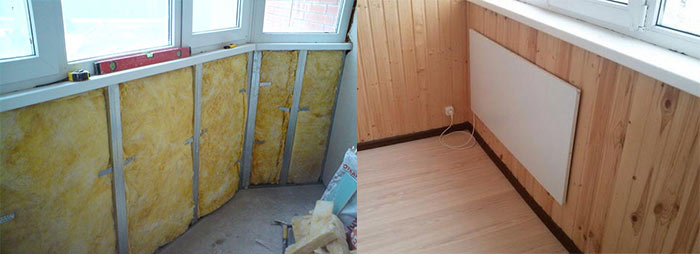
- Laying waterproofing. If penofol is used, you need to lay it down with foil. The film should cover the entire balcony floor and walls to a height of 50-100 mm. The joints can be sealed with tape.
- Laying the log. Sometimes a screed or warm floor can be laid, then this stage is skipped.
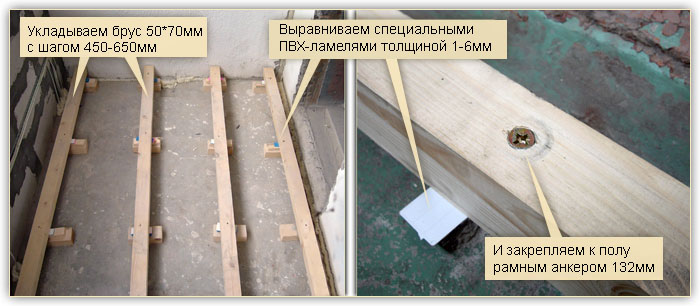
- Preparation of the bars. They need to be cut to the required size and primed.
- Laying the bars transversely. They should be laid at a distance of 50-70 mm from the vertical plane. The intermediate distances between them are 500-600 mm, depending on the width of the insulation sheet. Fixed with self-tapping screws. The extreme timber should be fixed with 4 dowels, the transverse ones - with 2. All stages of the installation of the timber should be controlled using the building level.
After correctly installing the bars, you can proceed to installing the heat insulator.
Insulation laying
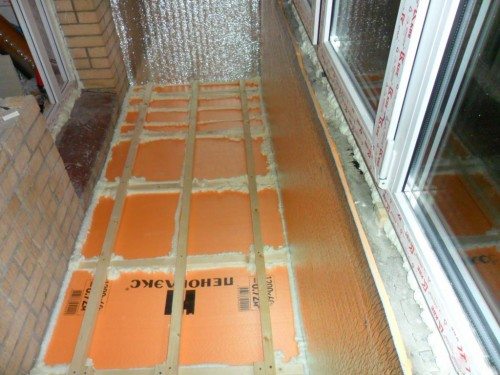
If polystyrene is chosen as insulation, it must be cut into pieces equal in size to the length and width of the cell from the lag. To hide the joints, it is better to do a two-layer styling. Then, instead of a sheet thickness of 100 mm, it is better to take twice as much material, 50 mm each. It is laid in two rows with an offset equal to half the sheet. Places of abutment to the wall and other sheets should be blown out with foam. This will reduce the number of cold bridges. Styling foam is done in the same way.
Mineral wool is cut with an indent of 10-20 mm. It does not need to be tamped into the cells, since air acts as a heat insulator. When compacted, the thermal properties deteriorate.A layer of vapor barrier must be laid on top, since condensation can form in the material. Because of it, fungus, mold and other harmful microorganisms can appear. You can fix the film with a construction stapler.
Sometimes expanded clay chips can be used. Since this is a free-flowing material, it must be laid inside the crate cells. Then it is leveled, tamped and poured with a concrete screed. The lathing can be omitted; in this case, the alignment is provided with a screed.
When installing insulation, you can move around the floor area only along the logs. This will prevent damage to the thermal insulation.
After laying the insulation, you can proceed to finishing the floor. Laminate, linoleum or boards are chosen as the coating.
Common mistakes
Installation of thermal insulation is not difficult, but the craftsmen can make some mistakes. One of the most common is wall, floor and ceiling insulation with one material. They have different degrees of freezing, so different insulators are needed.
When using penoplex, a frame should be made of wooden logs. It is difficult to lay it on metal profiles.
To preserve the boards and improve efficiency, it is better to use a hydrophobic agent. All joints are blown out only with polyurethane foam. Gypsum filler will cause condensation.
Heat escapes from the room not only through the floor. It is recommended to insulate the walls and install high-quality windows with a good windproof frame.


