Polycarbonate is a practical and easy-to-install material for a wide range of applications. You can make gazebos from it, sheathing the frame with sheets completely or using them to create a transparent roof, sheds for fences, transparent buildings for growing plants. Installation of polycarbonate is simple, but requires knowledge of the characteristics of the material's response to environmental conditions.
Types of polycarbonate
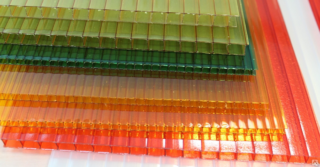
Having decided to place polycarbonate structures on the site, you need to decide which type of material is best suited for a specific task. They differ in structure and surface relief, as well as in some technical parameters. The following types are distinguished:
- Monolithic polycarbonate sheets have a uniform texture on the cut without voids, the same color throughout the entire thickness, and a smooth surface. They can be completely transparent or have less light transmission. On sale there are sheets painted in different shades. Their thickness can be from 1 mm to 2 cm. This type has the best performance in terms of its ability to transmit light. However, the installation of monolithic polycarbonate requires consideration of its tendency to scratches. Cut such material carefully. There are products with an anti-abrasive coating on sale. Before fixing monolithic polycarbonate, it is necessary to provide for a gap for possible expansion, especially if the procedure is carried out in a cool season. At high temperatures, the material increases in size.
- Profiled sheets have a wavy or trapezoidal relief, the size of the elements of which can vary. Sheets with a high degree of light transmission are usually calm in color, while opaque ones are juicy. In terms of strength, the material is comparable to corrugated board, while having a significantly lower weight. It is suitable for arranging greenhouses, fences and even roofs of non-residential structures and terraces. The thickness of the sheets is usually 1-1.5 mm.
- The cellular version has a more complex structure. It consists of thin layers and bridges connecting them, making the structure stiffer, therefore, in cross section, it resembles a honeycomb. Empty areas improve thermal insulation properties. The number of layers in a sheet, as well as the thickness of the latter, vary within a fairly wide range. On sale there are options with a thickness of 0.4 to 5 cm. Installation of cellular polycarbonate, like other types of material, requires taking into account the tendency to expand at high temperatures.
The greater the number of hollow chambers between the layers, the better the thermal insulation properties. Their shape also affects its properties: if the "honeycomb" is in the form of a hexagon or triangle, the sheets will be very strong, but less flexible. Products with rectangular chambers bend well, but they can be ripped off or displaced by strong winds if the fasteners are not reliable enough.
DIY cellular polycarbonate installation
Cutting the material is not difficult, but installation requires care, since the material is quite fragile. Walking on cell sheets is strictly prohibited. When carrying out work, follow the manufacturer's instructions and do not bend the product more than recommended.When cutting sheets, accuracy is important, otherwise the protective coating that protects the material from ultraviolet radiation will be damaged. If chips accumulate inside the honeycomb during the cutting process, they must be removed at the end of the work.
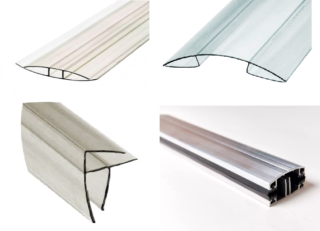
In order for the honeycomb sheets to last longer and not to get water and mold inside, you need to purchase profiles for the slats. Thermal washers for fasteners and sealed tapes are also needed. The product packaging contains manufacturer's recommendations for installation. They must be observed in order for the design to be reliable. In advance, you should prepare an estimate for the purchased materials.
Required tools
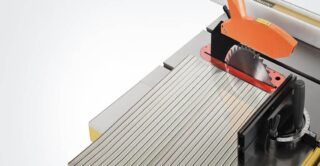
Before laying the polycarbonate, you need to prepare the tool. For cutting sheets of small thickness (up to 1 cm), a hand hacksaw is well suited. Its use requires a certain skill, otherwise the products can be damaged. A circular saw with a carbide blade is suitable for thick sheets. It is possible to use a jigsaw equipped with a fine-toothed file. Thin products (up to 0.8 cm) are cut with a clerical knife.
Among other tools, you will need to prepare a hammer and a screwdriver. From adhesives, special products for polycarbonate are suitable for work.
Components
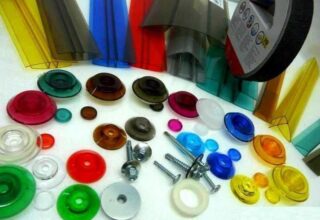
To seal the ends of honeycomb products, special aluminum strips are installed so that water, dust particles, microscopic spores of mold and other pests, as well as insects, do not penetrate inside. For the lower ends, tapes with perforations and a profile that close the free gaps are purchased. The tops are protected with monolithic tapes without holes. When assembling polycarbonate for arch structures, tightening galvanized strips are also used. The profiles for the bottom ends are L or F.
Before installing the fasteners, it is important to correctly make holes in the sheets. Drills designed for wood are used for this. In this case, it is important that the process does not generate excess heat that can lead to deformation of the material. Therefore, the drill is set at medium speed. The distance from the hole to the nearest edge of the product must be at least 2 cm.
For the installation of the mounts, sealing thermal washers are purchased, which create a barrier to water. These parts consist of flexible plastic rings and plugs. Sometimes self-tapping screws are already supplied with washers, but more often they have to be purchased separately. There are also mini-washers on sale, which are smaller in size.
Layout of sheets and installation temperature
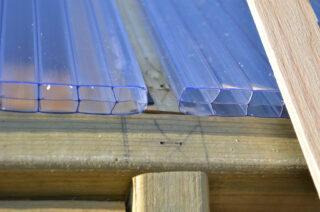
The honeycombs of the sheets should be placed vertically so that water does not penetrate inside and there are no obstacles for the release of condensate. Do not install polycarbonate horizontally, otherwise the accumulated moisture, freezing, will deform the structure of the material.
Due to the tendency of the material to change the volume during heating and cooling, it is necessary to imagine at what temperature polycarbonate can be mounted and what consequences go beyond these limits are fraught with. In cold weather, the sheets become brittle, which increases the risk of cracking when bending. When working with material in winter, the holes turn out to be too large (due to compression in volume), due to which the tightness of the fasteners is broken.
The recommended installation temperature for polycarbonate is from 0 to + 20 ° C. Some varieties can be operated at temperatures up to -10 degrees. During storage, it is also recommended to keep the sheets at this temperature. In rooms that are too warm, the material expands.
Installation methods depending on the roof structure
When embedding in frames, the severity of thermal expansion is taken into account (it depends on the thickness of the products) and a clearance of at least 0.5 cm is provided. The seams are treated with mastic.
For pitched structures, aluminum profiles are used, for arched and hinged structures - of polycarbonate.
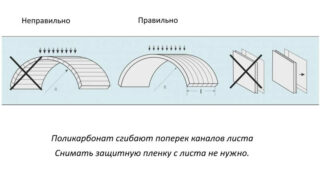
You cannot bend products across the stiffeners.
If aluminum profiles are used during the installation of the arch, they should have a slightly smaller radius than that of the structure itself.
Frame structures are made up of wooden blocks that can be connected with simple nails. Metal frames from professional pipes are also used. Sheets on them begin to be mounted from the middle on pre-installed profiles. The step between the fasteners is made equal to 0.3 m. The installation of sheets on a wooden frame, on the contrary, starts from the edge. They should protrude slightly beyond the edges of the bars. The joints are made directly above the elements of the frame.

