Monterrey metal tile is one of the most popular materials for roofing. It is a steel sheet with galvanized and polymer coating on both sides. The latter is most often made from polyester or pural. Correct installation of Monterrey metal tiles on the roof involves fastening the material to the crate and is easy to do with your own hands.
Pros and cons of roofing material
Like other sheet steel materials, shingles are strong and durable. The material can maintain its performance for up to half a century. Other benefits include:
- light weight;
- ease of installation;
- no damage caused by moisture;
- a large selection of shades due to the variety of coatings used;
- resistance to mechanical damage and aggressive chemical influences.
The disadvantage of the product is the same as that of other materials from the metal profile: due to the low sound insulation qualities when installing the tiles, Monterrey will have to put up with the noise of rain drumming on pitched surfaces, especially when you are on the attic floor. Also, after installing the material, there will be quite a lot of waste.
Installation tools
Well-dried boards with a width of 10 cm are used as a crate.For the bottom row, their thickness should be at least 4.5 cm, for the rest, 3 cm is enough.You will also need beams about 1.3 m long with cut parameters of 3x5 cm.If the roof has a large steepness slopes (more than 30 degrees), it is better to choose a material with a square section with a side of 5 cm. Usually a coniferous timber is taken. All lumber should be free from surface defects, knots, dark spots and, moreover, rotten parts. Pre-workpieces must be well dried. They are treated with antiseptics and flame retardants. From the toolkit, when installing the lathing, you will need a saw, a hammer and a construction tape. Planks and timber are fastened with ordinary nails.
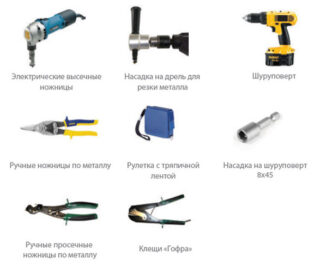
To install the tile itself, you need the following tools:
- special self-tapping screws with rubber or silicone gaskets;
- marking lace;
- building level to control evenness;
- scissors for cutting metal (it is unacceptable to use a grinder, even at low speeds, otherwise the coating will be damaged);
- screwdriver or screwdriver for mounting screws.
In addition to directly tiled sheets, additional parts will need to be attached to the roof to prevent moisture seepage into the under-roof space. They are represented by numerous planks (cornice, end, ridge, for the valley), as well as a gutter.
The heads of the screws used must be painted in a shade identical to the color of the tiles: then they will not be visible on the surface.
Installation instructions for metal tiles
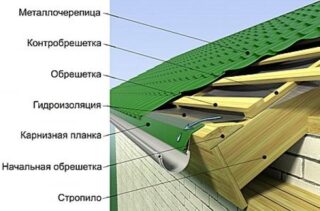
First you need to assess the evenness of the base: if depressions are found, they are leveled with bars of thickness corresponding to a decrease in the surface level. Then, to ensure waterproofing, pieces of roofing material or plastic film are laid with an overlap of 0.2 m. They should not be tightly pulled. They should lie loosely, but not sag to such an extent that they come into contact with the thermal insulation material inside the rafters. In the future, the installation manual looks like this:
- Attach vertical beams, forming a wooden frame, with a step of 0.3 m. Since the valleys are forced to withstand an increased load in winter due to snow masses, a denser crate is made in their areas. The step in this case is reduced to 0.1 m. When organizing the lathing, you should not use too many nails (more than 8-10 per 1 m²), since such a number of holes in the waterproofing layer impairs its protective qualities.
- Then boards are horizontally stuffed onto the timber. They begin to do this from the lower parts, moving up to the skate. The distance between them is made a multiple of the interval between the waves. For the lower perimeter, thickened boards (4.5 cm) are used. The end parts of the rafters, valleys and areas near the chimney must be completely closed.
- Then, additional elements are laid - strips (cornice and abutment), gutter holders.
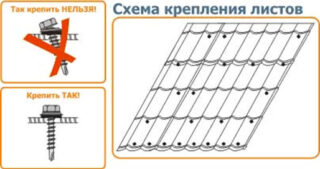
- The ridge is being installed. If the slope values are in the range of 25-40 degrees, a semicircular design will do. It is fastened along a straight edge, and the ends are closed with plugs. Other roof structures use parts with suitable angles to achieve a smooth transition. Fastening is done with screws in the upper wave of sheets (while the tile itself is fixed to the crate in the lower one). If a flat ridge is used, it is mounted with an overlap of at least 0.1 m.
To prevent incidents of sudden snow melting in winter, special parts are installed on the roof. The simplest snow holders are corner ones. Like roofing material, they consist of thin steel and a polymer coating.
Fixation is carried out along the upper wave of the sheet on self-tapping screws or corners. There are other options, for example, polycarbonate structures that follow the shape and dimensions of the bend of the material. Fix them so that they fit snugly on the upper wave.
More complex snow retainers are tubular and lattice. When installing the first option, the holders with brackets are first fixed (suitable screws are included in the kit), and tubes are inserted into specially provided holes in them. Installation of lattice structures is a more complex activity and is usually carried out on a turnkey basis.

