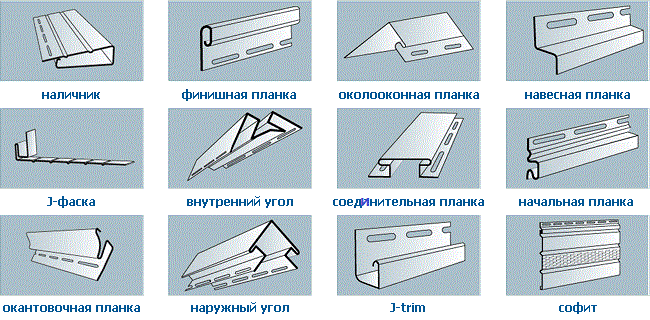
When finishing the facade, not only the finishing material itself is needed, but also additional elements. Their appearance and character depends on the characteristics of the cladding. During installation, the siding is tightly joined and connected with special profiles. One of them is the siding strip.
What is the window strip for?
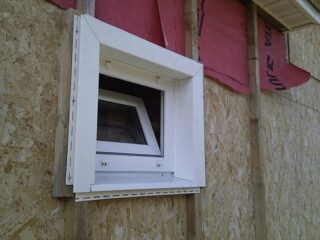
The weak point of any cladding is joints and seams... Manufacturers are trying to develop such assembly technology that would minimize their number or safely hide them. Siding is no exception. During assembly, the joints between the lamellas are closed automatically thanks to the "tongue-in-groove" connection method. However, when joining lamellas at the corners, near window and door openings, difficulties arise.
The framing of the window opening will give the facade an aesthetic finished look. But in fact, its purpose is different. "Frame" around the opening protects the joints of the siding with the window and prevents moisture penetration under the casing or through the opening into the room. Window plank - a special element that allows you to hide the ends of the lamellas and close the joints.
This kind of profile is not always needed.... Siding and all additional elements are designed to certain standards. For example, a window opening, according to European requirements, is recessed into the wall by 13 cm.However, in private construction, it is not uncommon for the double-glazed window is literally flush with the wall. You have to frame the opening using another profile - J-bars.
When installing wooden windows, a strip is required. Reinforced plastic can do without it. According to the norms, such a window deepens into the wall by 1/3. Here the slopes turn out to be larger than the size of the bar, so there is no need for it.
Dimensions and features
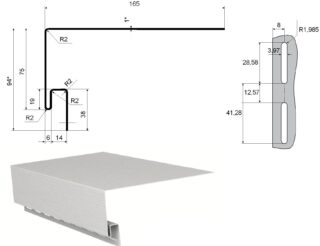
Dimensions (edit) window siding strip determined by the manufacturers:
- length 304 cm, width of the slope 15 cm, width of the outer part 7.5 cm;
- length 308, slope 23.5 cm, and the size of the outer part 8 cm;
- 305, 23 and 7.4 cm, respectively.
The first option is called narrow, the other 2 are called a wide strip, sufficient to cover the slopes. Models release only standard dimensions, therefore, when facing old houses with decoration, difficulties arise.
Color and texture the planks match the shade and texture of the siding. Often, to highlight the openings, a bar of a contrasting tone is chosen.
Protective and fastening elements
For window decoration you can use other profiles:
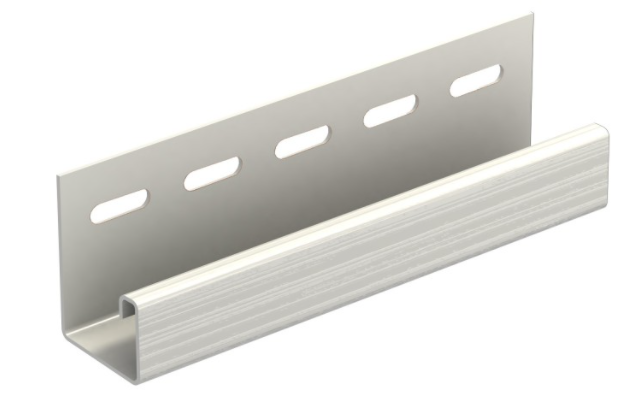
- J-profile - a universal option that replaces almost all fittings. It is used to hide the edges of the sheathing;
- window - used to decorate slopes;
- finishing plank - elements are attached to it;
- chamfer - together with the finishing strip, replaces the window;
- platband - a decorative element, but if the window is on the 1st level with the facade, it is used instead of the window strip.
In extreme cases, the framing can be made from lamellas with your own hands.
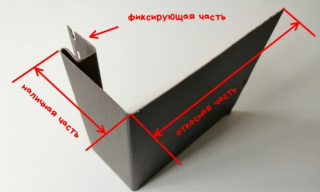
The construction of the window siding strip
- Internal - larger in size. Covers seams and slopes. At the same time, it plays the role of a retainer.
- Outdoor - smaller in size. Protects the ends of the lamellas, which fit tightly with it. Serves as a framing.
- J-element - fixing part. This is a U-shaped edge that ensures the joining of the panels in one plane. Oval holes are made along the edge for fastening.

Calculation of the near-window plank simple. However, the installation method must be taken into account. Usually they frame the side slopes and the top, and the low tide is mounted below. The number is calculated as the total length of all slopes and the top of all windows. The value is increased, since the trimming of the corners on each side must be left by 6 cm.If the ebb is not set and a bar is attached instead, the perimeter of the opening is calculated, 6 cm is added for the trim and multiplied by the number of windows.
Width of slopes and window sill
Although the wiring diagram is the same, the sequence and assembly method may differ... It depends on the width of the slope and the method of cutting.
Window installed at wall level
The near-window strip is not used, since there are no slopes in the opening. Take a J-profile for framing.
Step-by-step instruction next.
- The profile is cut to size, the side strips are immediately attached to the edge of the opening.
- The top bar protrudes 6 cm on both sides. Before installation, 2 cm long incisions are made from the edge of the part and the fragments are folded down.
- For greater aesthetics, it is recommended to cut the angle at 45 degrees, but this is not necessary.
- The bar is fastened, and the bent fragments are inserted into the side profiles.
There is no low tide in this design either. Instead, an element of the required length is cut out of the J-profile and placed at the bottom.
Window opening with slopes up to 20 cm wide
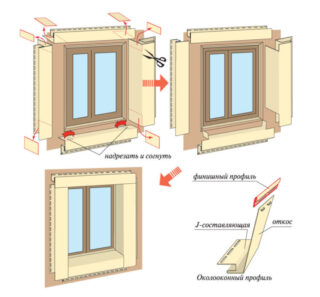
Installation on an opening with a depth of 20 cm is carried out in 2 ways - with and without undercutting... The second method is more common.
- In the opening with slopes, the first to install horizontal strips - upper and lower, if there is no low tide. Cut them in a special way. The length of the top bar will be the width of the window plus 6 cm on each side. From the inside, the plank is trimmed 6 cm on each side, while the outer, narrower part remains unchanged. Fragments of the wide part are not cut off, but bent.
- The bottom bar is prepared in the same way.
- The side ones are fastened to the finishing bar, the bent tongues of the upper bar are bent and inserted, as it were, into the side profile. The lower tabs are folded up and the same is introduced into the profile.
The pruning method is somewhat more complicated. In this case, the strips are marked out and a part is cut off at an acute angle so that the elements are tightly closed during assembly. This kind of frame looks prettier, but requires more precise calculations and adjustment. In this case, the tabs of the upper and lower planks are also wound into the profile.
Window slopes over 20 cm
With a window depth of more than 20 cm it is impossible to install a window strip... Framing is done using other elements.
- A finish bar is installed along the perimeter of the frame.
- An outer corner is fixed along the perimeter of the opening.
- The slope is sewn up with pieces of lamellas. During installation, the thermal gap is taken into account.
- The corners are overlapped with simple corners or double slats.
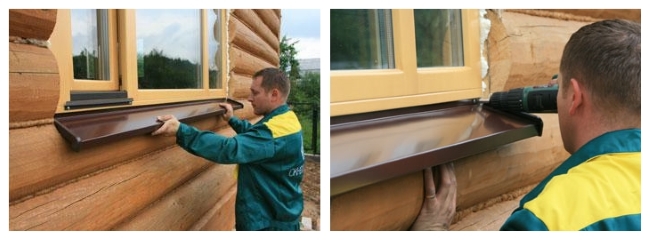
The low tide must be installed. The size of the ebb is 4 cm larger than the width of the slope: 3 cm for draining water from the wall, 1 cm for installation on a window frame.
Useful Tips
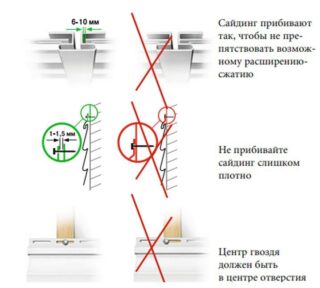
- When attaching siding, the nature of the material and weather conditions are taken into account. Self-tapping screws do not fit snugly to the surface profile or lamella. The size of the gap varies from 1 to 6 mm. When installed in hot weather, the lamellas acquire the largest possible volume. Therefore, the gap is kept to a minimum. In the cold, siding has the smallest dimensions, which inevitably increase with warming. Accordingly, the gap is maximized.
- The fasteners are always placed in the center of the oval hole.... Plastic siding changes not only in volume, but also in length. In this case, the element can move along the attachment and not deform.
- Installation is easier during the warm seasonsince it is easier to make a small gap than a large one. However, do not sheathe the facade during rain or when it is of increased importance.
- You need to take only galvanized fastenersas it is resistant to corrosion and does not rust.
When finishing the facade in winter, the material is previously left in a warm room for 12 hours so that the lamellas do not lose their flexibility in the cold.

